Cleaning and reapplying CPU thermal paste is crucial for optimal heat transfer, preventing overheating, and maintaining long-term performance.
In this guide, we’ll cover everything you need to know about safely cleaning CPU thermal paste.
Why Clean Thermal Paste?
Thermal paste fills microscopic gaps between the CPU and cooler surfaces, ensuring efficient heat transfer. If it becomes dry or old, it can cause:
- Overheating: Poor heat dissipation leads to higher CPU temperatures.
- Decreased performance: Thermal throttling occurs when the CPU lowers its performance to avoid damage from overheating.
- System instability: Random crashes, freezes, and shutdowns can result from poor cooling.
Regular maintenance, including cleaning and reapplying thermal paste, helps prevent these issues.
What You’ll Need:
Before you start, gather the necessary tools and materials:
- Isopropyl Alcohol (90% or higher): This evaporates quickly and leaves no residue, making it ideal for cleaning thermal paste.
- Lint-free Cloth or Coffee Filter: To avoid leaving fibers on the CPU surface.
- Plastic Spatula or Card: For gently scraping off old paste.
- Cotton Swabs: For precise cleaning in tight spaces.
- Thermal Paste: Ensure you have fresh thermal paste to reapply once the old paste is removed.
Step-by-Step Guide to Clean CPU Thermal Paste:
Turn Off and Unplug Your Computer:
Before starting, ensure your safety by completely powering off your PC and unplugging it from the power source. This step is crucial to avoid any risk of electrical shock or damage to your components.
Additionally, it’s a good idea to ground yourself by touching a metal surface or wearing an anti-static wrist strap to prevent static discharge that could harm sensitive internal parts. Always prioritize safety when working with your computer’s hardware.
Open Your Computer Case:
Carefully remove the side panel of your PC case to access the CPU cooler. This step exposes the necessary components for cleaning and maintenance.
Be sure to ground yourself by touching a metal object or using an anti-static wristband to prevent static electricity from damaging sensitive internal components. Proper grounding is essential to protect your hardware during the process.
Remove the CPU Cooler:
- Unscrew or unclip the CPU cooler from the motherboard. Refer to your cooler’s manual for specific instructions if needed.
- Once removed, gently twist the cooler to break the bond of the thermal paste.
Also Read: How To Undervolt Cpu – A Step-by-Step Guide for Better Performance and Lower Temperatures!
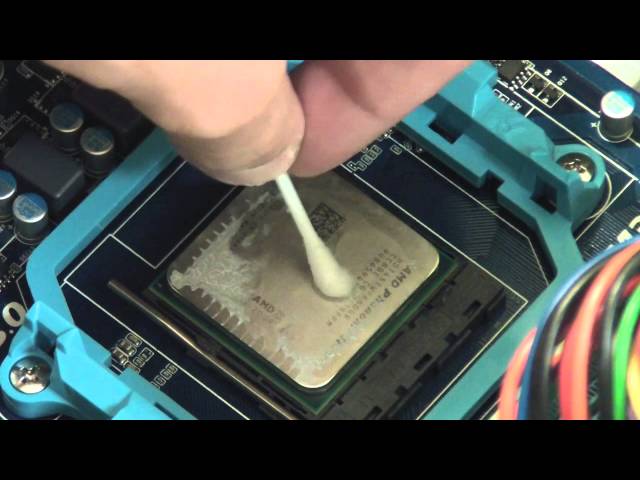
Remove Old Thermal Paste:
- Gently Scrape: Use a plastic spatula or card to scrape off the bulk of the thermal paste from the CPU and cooler surfaces.
- Apply Isopropyl Alcohol: Moisten a lint-free cloth or coffee filter with isopropyl alcohol. Avoid using paper towels, as they can leave fibers behind.
- Wipe the Surfaces: Gently wipe the old paste from the CPU and cooler surfaces. For hard-to-reach areas, use cotton swabs with alcohol.
Ensure Surfaces are Completely Clean:
Thoroughly inspect the CPU and cooler to ensure all traces of old thermal paste are completely removed. Both surfaces should appear clean, smooth, and shiny without any residue.
If necessary, repeat the process of applying isopropyl alcohol and wiping with a lint-free cloth until the surfaces are spotless. Ensuring a clean surface is crucial for optimal heat transfer when applying fresh thermal paste.
Allow Surfaces to Dry:
Allow the CPU and cooler surfaces to dry fully before reapplying new thermal paste. Since isopropyl alcohol evaporates quickly, this process typically takes just a few minutes.
Ensure no moisture remains on either surface to avoid potential damage or poor heat transfer. Once dry, you’re ready to apply the new thermal paste and reassemble the cooler.
Tips for Reapplying Thermal Paste:
Now that the old thermal paste is removed, it’s time to apply a fresh layer.
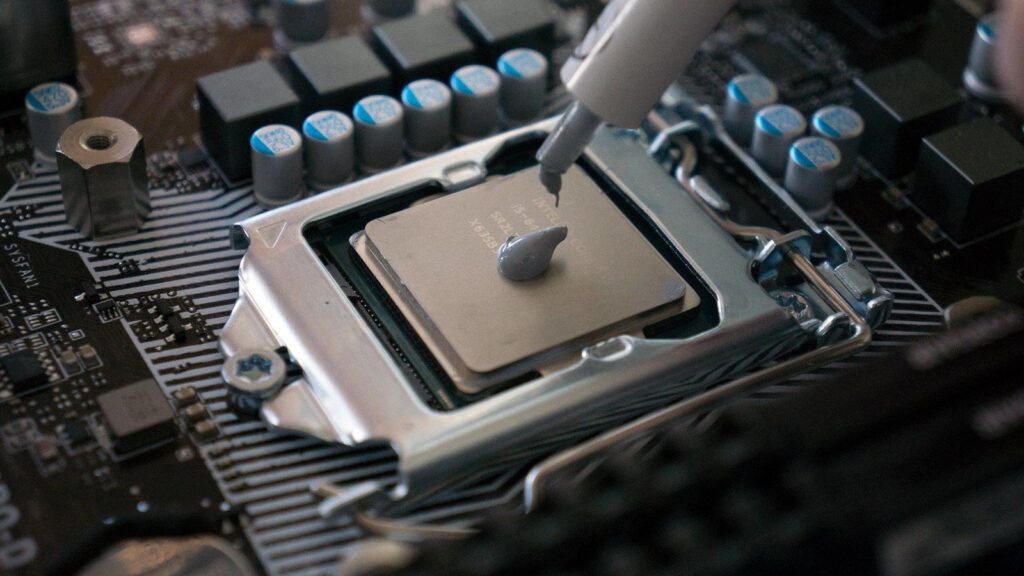
- Choose High-Quality Thermal Paste: Opt for reputable thermal paste brands to ensure effective heat transfer.
- Apply a Small Amount: A pea-sized dot in the center of the CPU is sufficient. The pressure from the cooler will spread the paste evenly across the surface.
- Reattach the Cooler: Secure the CPU cooler back onto the motherboard, ensuring an even and tight fit to avoid air pockets.
Common Mistakes to Avoid:
- Using Too Much Thermal Paste: Excess paste can spill over and may even cause short circuits on your motherboard. A small, pea-sized amount is all you need.
- Not Allowing Surfaces to Dry: Make sure all surfaces are fully dry before reassembling the components.
- Skipping Regular Maintenance: Even if your system is running smoothly, regularly reapplying thermal paste every 1-2 years ensures consistent performance.
FAQ’s
1. Why should I clean thermal paste off my CPU?
Cleaning thermal paste ensures proper heat transfer between the CPU and cooler, preventing overheating and performance loss.
2. How often should I clean and reapply thermal paste?
It’s recommended to clean and reapply thermal paste every 1-2 years or if you notice higher temperatures.
3. What tools do I need to clean thermal paste?
You’ll need isopropyl alcohol, a lint-free cloth, cotton swabs, and a plastic spatula or card for scraping.
4. Can I use regular cleaning supplies to remove thermal paste?
No, only use high-purity isopropyl alcohol (90% or higher) to avoid leaving residue.
5. How much thermal paste should I apply after cleaning?
A small, pea-sized amount in the center of the CPU is sufficient for optimal coverage.
6. What happens if I use too much thermal paste?
Excess thermal paste can spill over and potentially cause short circuits or improper cooling.
7. Do I need to clean the cooler as well?
Yes, clean both the CPU and cooler surfaces to ensure proper heat transfer.
8. How long does it take for isopropyl alcohol to dry?
Isopropyl alcohol dries in a few minutes, but make sure the surfaces are completely dry before reassembly.
9. Can I reuse the thermal paste once it’s removed?
No, always apply fresh thermal paste after cleaning the old paste.
10. What are the signs that I need to reapply thermal paste?
Higher CPU temperatures, thermal throttling, or system instability are signs that your thermal paste may need reapplication.
Conclusion
Cleaning and reapplying thermal paste is an essential step in maintaining your CPU’s performance and longevity. By ensuring proper heat transfer, you can prevent overheating and maintain optimal system efficiency. Regular maintenance helps extend the life of your processor and avoids potential hardware problems.