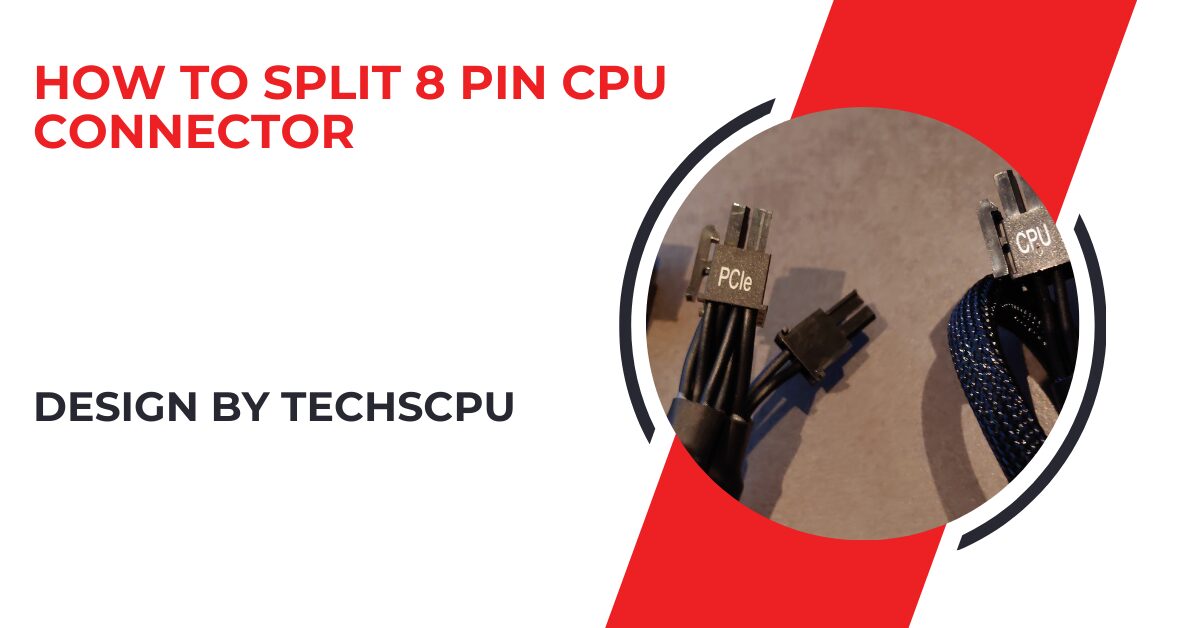
When building or upgrading your computer, you might encounter a situation where you need to split an 8-pin CPU connector into two 4-pin connectors. This task can be necessary if your motherboard or power supply requires such a configuration.
This comprehensive guide will walk you through the process step by step, ensuring you can complete the task confidently and correctly.
Understanding the 8-Pin CPU Connector:
What Is an 8-Pin CPU Connector?
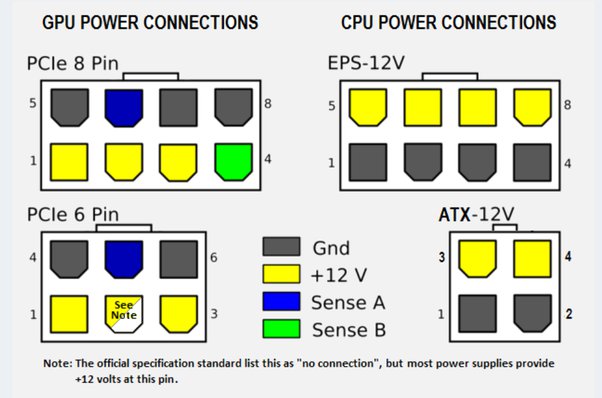
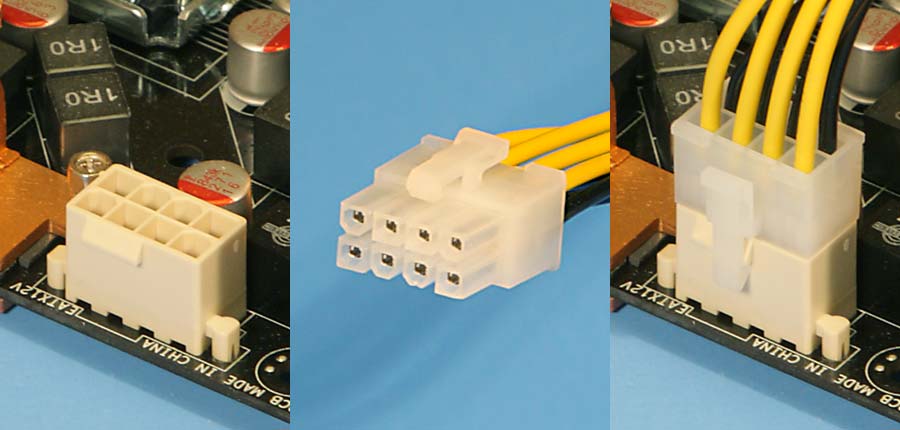
The 8-pin CPU connector, also known as the EPS connector, is designed to provide additional power to the CPU. This connector is critical for ensuring that your processor receives the power it needs to operate efficiently, especially in high-performance or overclocked systems.
The 8-pin connector is typically found on modern motherboards and power supplies and is often used in conjunction with other connectors to supply power to the motherboard and CPU.
Why Would You Need to Split It?
In some cases, your motherboard may have a 4-pin CPU power socket or require an additional 4-pin connector alongside an 8-pin connector.
This can be due to various design specifications or power requirements. Splitting the 8-pin connector allows you to adapt to these different configurations without needing to purchase new cables or connectors.
Tools You’ll Need:
Before you start, ensure you have the following tools and materials:
- A Small Flathead Screwdriver: Useful for prying apart the connector.
- Good Lighting: A well-lit workspace will help you see the small details of the connectors.
- Patience: Handling these small components requires a steady hand and patience.
Step-by-Step Guide to Splitting the Connector:
Step 1: Inspect the Connector
Begin by closely examining your 8-pin CPU connector. You will notice that it is typically composed of two 4-pin segments clipped together. This design allows for easy splitting when necessary.
Step 2: Locate the Split Point
Identify the point where the two 4-pin segments are joined. You will usually see a slight separation or a visible clip holding them together.
Also Read: How To Beat All Madden Cpu – Tips and Strategies for Success!
Step 3: Gently Pry Apart the Segments
Using your small flathead screwdriver, carefully pry apart the segments. Insert the screwdriver into the gap at the clip and twist gently. It is crucial to be cautious to avoid damaging the pins or the plastic casing.
Step 4: Separate the Connectors
Once the clip is disengaged, you can carefully pull the two 4-pin segments apart. They should come apart easily without requiring much force. If there is resistance, check for any additional clips or attachments.
Step 5: Inspect the Separated Connectors
After successfully splitting the 8-pin connector into two 4-pin connectors, inspect them to ensure there are no damages. Make sure all the pins are straight and the plastic casing is intact. Any damage could lead to improper connection or functionality issues.
Tips for a Successful Split:
- Handle with Care: Always handle the connectors gently to avoid bending the pins or damaging the plastic casing.
- Verify Compatibility: Ensure that your motherboard can accommodate the split 4-pin connectors. Some motherboards may require a single 8-pin connector, while others may need the additional 4-pin for stable operation.
- Consult Manuals: Always refer to your motherboard and power supply manuals for specific instructions regarding power connectors. These manuals provide essential information on the correct power configuration for your setup.
Troubleshooting Common Issues:
Connector Won’t Split:
If you are having trouble splitting the connector, double-check for any additional clips or latches that might be holding it together. Applying a bit more gentle pressure with the screwdriver might help. If it still won’t split, consult your power supply manual for guidance.
Bent Pins:
If you accidentally bend a pin, use a small tool, like tweezers, to gently straighten it. Be very careful, as pins can break easily if mishandled. A bent pin can lead to poor connection and potential damage to your components.
Connection Issues:
If your computer doesn’t power on after splitting and connecting the 4-pin connectors, ensure they are seated correctly in the motherboard socket.
Double-check all connections and refer to your motherboard manual. Sometimes, a loose or improperly seated connector can cause power issues.
Additional Considerations:
Compatibility Check:
Before you start the splitting process, it is wise to check if your motherboard can function with split connectors. Some motherboards are designed to work only with an 8-pin connector, while others can operate with either configuration. Refer to your motherboard’s user manual for detailed compatibility information.
Power Supply Capabilities:
Ensure that your power supply can deliver adequate power through the split connectors. Some power supplies may have limitations on the power they can deliver through individual connectors. Checking your power supply’s specifications can prevent potential issues.
Also Read: Cpu Machine Check Architecture Error Dump – A Comprehensive Overview!
Regular Maintenance:
Regularly inspect your power connectors and cables for any signs of wear or damage. Over time, connectors can become loose or damaged, affecting the performance and stability of your system. Regular maintenance can help you identify and fix issues before they become significant problems.
FAQ’s
1. What is an 8-pin CPU connector?
An 8-pin CPU connector, also known as the EPS connector, provides additional power to the CPU for efficient operation, especially in high-performance systems.
2. Why would you need to split an 8-pin CPU connector?
You may need to split it if your motherboard has a 4-pin CPU power socket or requires an additional 4-pin connector alongside an 8-pin connector.
3. What tools are needed to split an 8-pin CPU connector?
You’ll need a small flathead screwdriver, good lighting, and patience to carefully pry apart the segments without causing damage.
4. How do you locate the split point on the connector?
Identify the slight separation or visible clip that joins the two 4-pin segments of the 8-pin connector.
5. What should you do if the connector won’t split?
Double-check for any additional clips or latches, and apply a bit more gentle pressure with the screwdriver. Consult your power supply manual if necessary.
6. How do you handle bent pins during the process?
Use a small tool, like tweezers, to gently straighten any bent pins, being very careful to avoid breaking them.
7. What steps should you take if your computer doesn’t power on after splitting the connector?
Ensure the connectors are correctly seated in the motherboard socket, double-check all connections, and refer to your motherboard manual for guidance.
8. Why is it important to verify compatibility before splitting the connector?
Not all motherboards can function with split connectors. Checking your motherboard and power supply manuals helps ensure you’re using the correct power configuration for your setup.
Conclusion
Splitting an 8-pin CPU connector is a straightforward process that can be accomplished with minimal tools and a bit of care. Whether you are upgrading your system or dealing with compatibility issues, following these steps will help you split the connector without any hassle. Always handle the connectors gently and double-check your motherboard requirements to ensure a smooth and successful connection.